

35%Off


DIY Weevil Eye- Beginners Learning Solder Fun Kit
Original price was: $11.99.$7.79Current price is: $7.79.
- Cool DIY bug
- Beginners friendly
- Easy scheme
- Fun soldering
In stock
Description
DIY Weevil Eye- Beginners Learning Solder Fun Kit
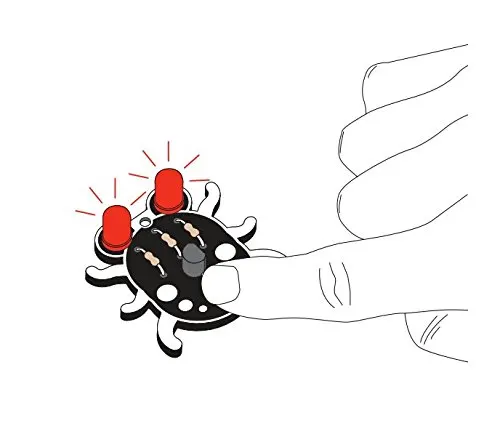
Once the Weevil Eye is soldered, we can test the board’s functionality.
- Put the 20mm coin cell battery into the battery holder, positive side up.
- 3V CR2032 battery required (not included in the package, due to international shipping restriction)
- If it’s dark, you should see the LEDs light up. If not, cover the sensor with your finger to test.
Troubleshooting:
If your Weevil’s eyes aren’t lighting up, don’t worry! Start with some simple troubleshooting. Check your solder joints to make sure your components have a good connection to your board – the solder should flow into the board and not ball up around the component’s pins. Also, check to make sure your transistor and LEDs are correctly oriented!
Package:
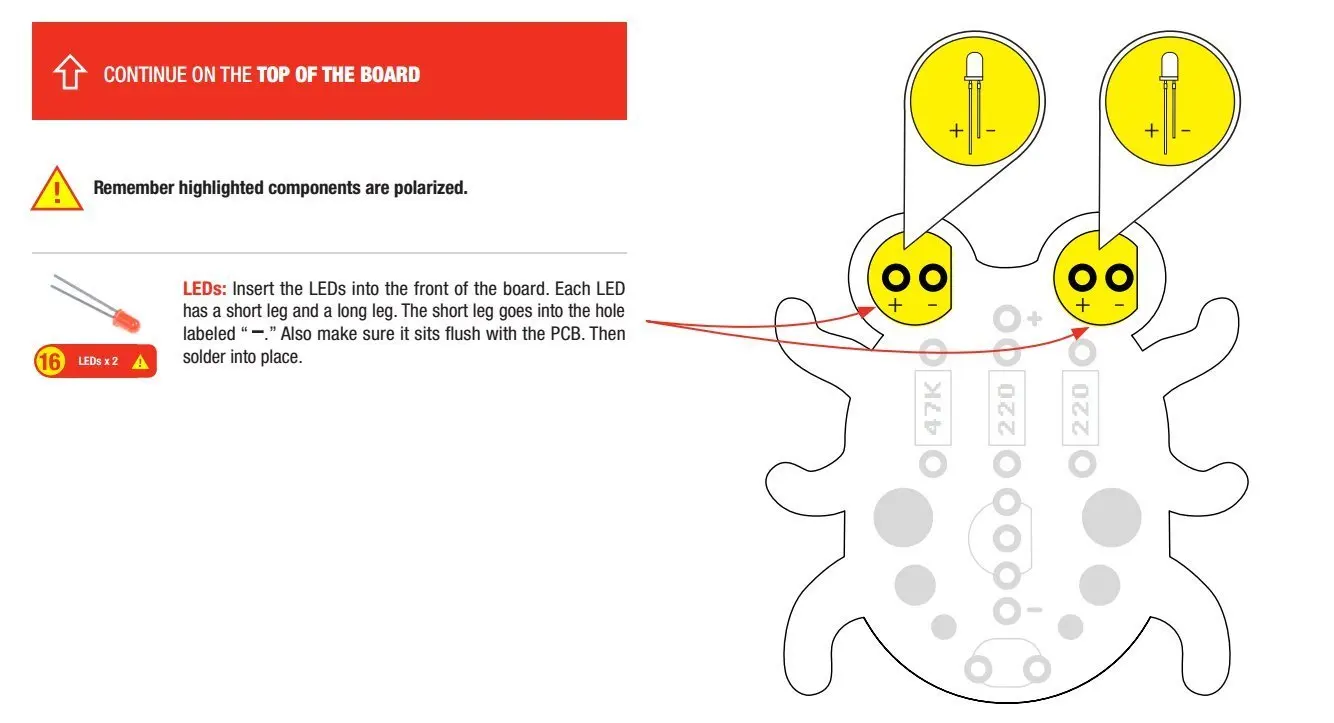
- 1 x WeevilEye PCB
- 2 x Red LEDs
- 1 x 47k Ohm Resistor
- 1 x Miniature Photocell
- 1 x 20mm Coin Cell Battery Holder
- 1 x 2N3904 Transistor
- 2 x 220 Ohm Resistors
* 30 DAYS MONEY-BACK GUARANTEE
* 100% SATISFACTION GUARANTEE
Order today!
Click the “ADD TO CART” button!

Additional information
| Supply Voltage | 3V |
|---|---|
| Package | DIP |
Reviews (7)
7 reviews for DIY Weevil Eye- Beginners Learning Solder Fun Kit
Add a review
Related products
13%Off


Original price was: $96.99.$84.72Current price is: $84.72.
2%Off


Original price was: $9.09.$8.90Current price is: $8.90.
12%Off


Original price was: $9.99.$8.83Current price is: $8.83.
25%Off


Original price was: $83.99.$62.81Current price is: $62.81.
29%Off


Original price was: $37.69.$26.81Current price is: $26.81.
15%Off


Original price was: $13.99.$11.89Current price is: $11.89.
8%Off


Original price was: $14.99.$13.79Current price is: $13.79.
7%Off


Original price was: $9.99.$9.31Current price is: $9.31.
15%Off


Original price was: $108.67.$91.99Current price is: $91.99.
22%Off


Original price was: $12.79.$9.99Current price is: $9.99.
18%Off


Original price was: $44.99.$36.93Current price is: $36.93.
21%Off


Original price was: $107.74.$84.99Current price is: $84.99.

L***n –
Seems OK. Thx.
V***y –
Extremely interesting and cognitive toy
K***i –
Great.
D***n –
The package came with a delay. All the components look very good quality. Thanks, circuitmix
E***v –
Cool bug!! Going quickly, everything is intuitive.
M***l –
Everything arrived as described.
J***k –
great product, very satisfied, fast ship. Looking for another types of this.